Wednesday, November 14, 2018

Deploying Cloud POS Extensions.

Deploy Cloud POS Extensions


If you need to learn about cloud POS check out the following blogs.


Today we will  be discussing how to deploy Cloud POS extensions to cloud POS in order to test and try them before going live.

Inorder to deploy the CPOS extensions we need to follow these steps:

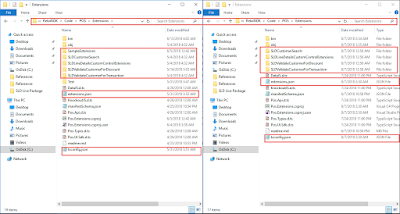
Place the extensions that have been developed in the cloud pos installation folder.
Place the  extension.json file to the cloud pos installation folder.


Just copy these files and place them to the installation folder, inside the extension folder.


Just Reload the Cloud POS in the browser and you will be able to see your extensions.

Monday, October 22, 2018


Running Modern Point of Sale (MPOS) and Cloud Point of sale (CPOS) Samples

Today we are going to discuss on how to run and use Modern Point of Sale (MPOS) and Cloud Point of Sale (CPOS) samples provided in the Retail SDK by Microsoft as a development guide for Retail extension and customization development.

For Details on the Retail SDK please see my previous 

blog here.

Let’s navigate to Retail SDK -> POS and see what’s in there.


As we can see here the POS folder contains a visual studio solution that contains files that are built in order to make these sample run. Let’s run the any of the project MPOS and CPOS to see the contents.

Usually the development is done on the CPOS so let’s run the CPOS so that we can further proceed with running the sample extensions aswell.

Start the visual studio as an admin and open the CloudPos project.

NOTE: Make a backup of RetailSDK before making any changes to the SDK.


As we can see that the solutions contains two projects which are POS.Web and POS.Extensions. All the Extensions and customization we do will be done in the POS.Extension project and we donot need to look at the POS.Web project as no changes will be made to so we can collapse that project.

Now we can see that the POS.Extension project contains only three files…. We will look into the details of the files later but if we go into the extension folder of the POS folder we can see many folder which are not visible here


The highlighted files in the folder are not visible in the project so we need to make them visible in order to work with them. To make the files visible click on the show all files button highlighted in the image below and you will see all the files that were in the folder here.


Now we need to include the files that we need for development purpose in the project so we can work with them so include only the files we need to the project. Since we will be only working with some extensions for this blog let’s just include the SampleExtensions and SampleExtension2 folders to the project. The necessary files for development are the files except the folder with are optional to include so lets include the files.


Since the Retail Modern POS is a typescript based application so all the extensions developed for POS will be in typescript. Before moving on with the discussion over the files in the POS.Extension project let’s just have a look on the basic Cloud POS so that we can then identify the POS extension we applied to the POS.


This is the basic POS screen … Let’s Navigate to any product in the product categories.


.
This is the basic POS product view screen as we can see that there are many panels displaying here and we can extend more here … lets now move on with the details of the POS files we previously included in the project so that we can run our sample extensions and check its impact.

The two most important file after the customizations files that we included in the form of folders are tscongif.json and extension.json.

Tsconfig.json:

If we look into this file we can see multiple sample extension listed. So what does this file do … basically the extension listed in this file are excluded from build and are not applied to the POS inorder to run sampleextension and sampleextension2 we need to  comment them out from this file.


Extension.json:

This file consists of the link to the base extensions folder which contains the extension. This specifies the POS to look for the specified extension in the place. Initially the file is empty and we need to specify which extension are place where.


To run these extensions just simply build the solution and login to POS.


Here you can see the highlighted product availability sample in action.

Introduction to Retail SDK


Working with Retail SDK

Microsoft Dynamics 365 ERP contains many modules one of which is the Retail module for carrying out the retail operations of an enterprise. For development purposes Microsoft provides a Retail SDK that contains samples for developing retail extensions, customization's and applications.
The Retail SDK is placed in the J:/ dive of the cloud hosted virtual machine (VM) and in the C:/ drive of the locally hosted VM. Since I will be working on a locally hosted VM it will be my C:/ drive.


Retail SDK is pre installed in the default d365 VM provided by Microsoft (In order to get Retail SDK one can get it through LCS by installing binaries then moving the Retail SDK from binaries folder to the development VM simply by coping this will be further discussed in upcoming blogs).
Let’s navigate to the Retail SDK folder and check its content.


As we can see the SDK contains many folders, each containing multiple other folders and files used in the development of Retail extensions and customization's. Let’s discuss each folder one by one to understand in detail the purpose of each folder.

Retail SDK Contents:

Assets Folder:
          Contains files used for deployment and package generation purposes.

Build Tools:
            Contains MsBuild tool files for building a Retail deployable package which can be deployed through LCS.

Database:
          Contains Database Schema and scripts for Retail Channel Database. Also contains Retail channel database extension scripts and schema.

Documents:
          Contains files related to SDK development.

Online Store:
          Contains files for E commerce Store (online store) development and extension.

Packages:
          Contains folders generated for deployment purpose also contains the retail deployable package that is generated by the MsBuild tool.

POS:
          Contains the files and folders for Retail Modern POS and Cloud POS extensions development and customization's.

Proxies:
          Contains folders and files for retail proxy generation.

References:
            Contains DLLs which are used in the retail SDK development and required by Retail SDK extensions.

Sample Extensions:
            Contains Folders for multiple type of extensions and customization's that can be performed in the retail SDK.

So the folders not discussed here are Payment-externals, Payments and Tools which will be discussed in further blogs.
The folders we will be mostly using for development of extensions will be POS and Sample Extensions.


Check out how to run retail pos samples here.

AX Metadata Error -- Forbidden


AX Meta Data Error – Forbidden


Error: Exception occurred on the metadata service on client or server – error: forbidden.

While setting report data source as query the above error occurred.


Solution :
To Solve the above issue, follow the steps as mentioned.
Step 1:
 Check for the “OfflineAuthenticationAdminEmail”  key in file “DynamicsDevConfig” in AOSService -> PackagesLocalDirectory->Bin to be set to  the correct login email that you are using.
In my case it was set to someone@somewhere.com  which then was change to the correct user.


Step 2:
Restart IIS by running command prompt as administrator and typing the issreset command.

Step 3:
Restart Microsoft Sql Server Reporting Services through the Service manager i.e Services.msc.

Step 4:
Restart the  visual studios and sign in with the user email which was set in the DynamicsDevConfig in step 1.


Wednesday, September 5, 2018

Retail Architecture


Retail Architecture

Note: Retail SDK contains samples for customizing the individual retail component.
Microsoft Dynamics 365 provides a large range of solutions for MNC and SME daily operational tasks, among these Retail is one module that is used for retail store and operations management in a simplified and unified manner. Dynamics 365 for Retail is comprised of multiple parts which combined together forms up a complete retail solution which are:


Retail Headquarter:
                Retail headquarter handles processes including but not limited to retail stores and channels management, Catalog management, Store wise assortments, Sales transactions, Pricing etc. It acts as a communication point between the retail stores, ecommerce stores and the head office. It is D365 for finance and Operations.

Channels:
                Channels are the retail stores which can be a physical entity or an ecommerce online store. Channels are the main end point for the retail operations. They are composed of retail point of sale (pos) and hardware stations. A channel may contain a retail server as well but not necessary.

Retail POS:
                Retail POS is the point of sale for the end to end business operations. Dynamics 365 for Retail offers two type of POS
                Modern Point of Sale (MPOS)
                Cloud Point of Sale (CPOS)
MPOS is a device based point of sale which can be deployed on a supported PC, tablet or phone. CPOS is a cloud based solution which is deployed on the cloud and accessed through a browser.


Retail store scale unit:
                Retail Store Scale Unit (RSSU) is comprised of attributes which provide retail operations capabilities to the stores where constant internet connectivity is not available. RSSU keeps in sync with the retail headquarter when internet connectivity is available.

Hardware Station:
                Hardware station is a server that provides centralized connectivity between the POS and hardware peripherals devices (printers, cash drawers etc). Hardware station can also be dedicated, which are peripherals directly connect to the MPOS without an 
intermediate server. 

Retail Server:
                Retail Server is comprised of a set of APIs which can be accessed in order to perform operations through POS or online stores.


The main component of retail server are
Entity Type
                An entity is just like an oop class it has a state which is to be monitored example a Customer
Complex Type
                A complex type is an ODATA concept which groups related information into one that can be reused by multiple entity types.
Controller
                A controller is a Web Api which contains actions which control the CRUD operations for the entities. A controller must be related to only one entity type.
Metadata
                Defines a contract between the client and server.

We can customize a controller or create new controller, entity type and complex type as per our need in the retail server.

Commerce Runtime (CRT):

                Commerce Runtime is the core engine which performs all the core business operations and contains the business logic for retail. It is comprised of multiple layers that are data access layer, workflow layer, service layer and API layer.


Commerce Data Exchange (CDX):
                          Performs the synchronization between the retail store and head quarter. It is comprised of real time services and async services. The real-time services are responsible for performing task such as issuing and redeeming a gift card, make payment through loyalty card, Inventory Lookup, while the async services are responsible for data exchange between the channel database and the retail head quarter.


Reatil Request Life Cycle:
                When an operation request is generated by the POS it calls a retail server Web Api which then based on the request type calls the required service, workflow, trigger or any CRT api. Which then generates a response and provides it back to the POS.


check out introduction to retail sdk here.

MERGING RETAIL SDK VERSIONS MANUALLY


MERGING RETAIL SDK - MANUALLY
Task: To merge customized Retail SDK version 7.2.11792.64377 to 7.2.11792.65099.
In order to merge code between the different versions of the Retail SDK first off open both SDK folders.


open both version files and compare changes while following the steps discussed.

Step 1:

In the “RetailSDK->Code->Assets” folder.Declare all commerce runtime (CRT) customized libraries in commerceruntime.ext.config from the previous version.


    Declare all Commerce Runtime customized libraries which are required for    offline support in CommerceRuntime.MPOSOffline.Ext.config from the          previous version.


  Declare all Dedicated hardware station customized libraries in  HardwareStation.Dedicated.config from the previous version.


  Declare the Commerce.RetailProxy customized library in dllhost.config  from the previous version. And any other library in the designated config file as required.
          

Step 2:

In the “RetailSDK->Code->BuildTools” Folder in customization.config.


    Provide the following details:
·        AssemblyNamePrefix.
·        CustomAssemblyVersion.
·        CustomVersion.
·        CustomName.
·        CustomDescription.
·        CustomPublisher.
·        CustomPublisherDisplayName.
·        CustomCopyright.

From the previous version file and update the version only.


  Declare all CRT customized libraries where the ISV_CommerceRuntime_CustomizableFile  are declared.


Declare all Retail Server customized libraries where the                                  ISV_RetailServer_CustomizableFile are declared.


    Declare all Hardware Station customized libraries where the                ISV_HardwareStation_CustomizableFile are declared.


    Declare all Custom Database scripts where the ISV_CustomDatabaseFile_Upgrade_Custom are declared.


Declare the required libraries for proxy generation in                                        RetailServerLibraryPathForProxyGeneration.


As required. Your Final File should contain all changes.


Step 3:

Place all the channel database upgrade files from previous version to newer    version in “RetailSDK->Code->Database->Upgrade->Custom”.


Step 4:

In “RetailSDK->Code->Packages->RetailServer->Code” in web.config file  declare all retail server customized libraries in the extension compositions    section.


Step 5:

           Paste all the required customization files from the previous version of   RetailSDK in “RetailSDK->Code->POS->Extensions” folder. Also, delete   any unnecessary extension folder except the bin and debug folder.


  Open ModernPOS.sln of newer version as administrator.


Select Extension project show all files in solution explorer include the                customization folders in the project and the files as displayed.


Also, include all the marked files as below.


 Open the extension.json file and include the baseurl element as displayed.


Step 6:

Paste all the extension libraries defined in step 1 in the “RetailSDK->Code-      >References” folder from the previous Retail version.


Step 7:

Run Visual Studios Developer Command Prompt as administrator and        change directory to the newer Retail SDK root.


And run the following commands


·    Msbuild /t:rebuild


Your deployable package is built, it can be access for deployment                    in  “RetailSDK->Code->Packages->RetailDeployablePackage” folder          you    can   also verify if the package is correctly built by looking in the              content            folder. You   can use the RetailDeployablePackage.zip file      for   deployment.